Mastering Sourdough Bread: A Complete Beginner's Guide to Baking

This guide covers everything needed to bake your first loaf of sourdough bread at home — from building a starter to shaping, scoring, and baking. Sourdough isn't just trendy; it's the oldest form of leavened bread, and once you understand the basics, you'll produce loaves that rival any artisan bakery in San Diego (or anywhere else) for a fraction of the cost. Whether you're after that crackling crust, the open crumb structure with those beautiful holes, or simply bread that doesn't trigger bloating the way commercial yeast loaves sometimes do, this guide walks you through each step without the intimidation factor.
What Is a Sourdough Starter and Why Do You Need One?
A sourdough starter is a living culture of wild yeast and lactic acid bacteria cultivated from flour and water. Unlike commercial yeast packets, which contain a single strain of Saccharomyces cerevisiae, a starter harbors dozens of wild yeast species and beneficial bacteria that leaven your dough while developing complex flavors.
Here's the thing: you can't make real sourdough without one. That tangy flavor, the chewy texture, the keeping quality that lets bread stay fresh for days — all of it comes from the fermentation process a starter provides. The bacteria produce lactic and acetic acids, which not only taste delicious but also break down phytic acid in the flour, making the minerals more bioavailable.
Building a starter from scratch takes about 7-10 days. You'll need:
- A clean glass jar (the Weck Tulip Jar works beautifully — wide mouth, easy to clean)
- Whole grain rye or whole wheat flour for the initial mix (more wild yeast on the bran)
- Unbleached all-purpose flour for ongoing feedings
- Filtered or dechlorinated water (chlorine kills wild yeast)
- A kitchen scale (the OXO Good Grips Stainless Steel Scale is accurate and affordable)
Mix 50 grams whole grain flour with 50 grams water. Stir, cover loosely, and leave at room temperature. Every 24 hours, discard half and feed with 50 grams all-purpose flour and 50 grams water. By day 3 or 4, bubbles appear. By day 7, it should double within 4-6 hours of feeding — that's your green light.
How Do You Feed and Maintain a Sourdough Starter?
Feed your starter once daily if kept at room temperature, or once weekly if refrigerated, using a 1:1:1 ratio by weight of starter, flour, and water. The math is simple — 20 grams of starter gets 20 grams flour and 20 grams water. This keeps the culture active without letting acid levels build too high.
The catch? Timing matters. A starter fed and left on the counter will peak (maximum rise) anywhere from 4 to 12 hours depending on your kitchen temperature. In San Diego's temperate climate, expect around 6 hours. You want to use it when it's at peak — dome-shaped on top, airy and webbed inside when you peek underneath. Past peak, it collapses, and the bread won't rise as well.
Worth noting: refrigeration is your friend if you don't bake daily. After feeding, let it sit out for 2 hours, then pop it in the fridge. The cold slows fermentation dramatically. When you're ready to bake, pull it out, give it 2-3 room-temperature feedings over 24-36 hours to wake it up, and you're back in business.
Many bakers keep a small amount of starter — the "scrapings method" — where you leave just a thin layer in the jar after using most of it. Feed that. It reduces waste (no discard) and works perfectly fine for home bakers making one or two loaves weekly.
What Flour Should You Use for Sourdough Bread?
Bread flour works best for sourdough, though all-purpose produces acceptable results with slightly less chew. The protein content — typically 12-14% in bread flour versus 10-12% in all-purpose — develops stronger gluten, which traps those fermentation gases and gives sourdough its characteristic open crumb.
Here's a breakdown of common flour choices:
| Flour Type | Protein Content | Best For | Brands to Try |
|---|---|---|---|
| Bread Flour | 12-14% | Standard loaves, open crumb | King Arthur Baking, Central Milling |
| All-Purpose | 10-12% | Beginners, softer crumb | Heckers, Gold Medal Unbleached |
| Whole Wheat | 13-14% | Flavor, nutrition (blend with white) | King Arthur Whole Wheat, Bob's Red Mill |
| Rye | 8-10% | Starter building, flavor accent | Arrowhead Mills, Bobs Red Mill |
| Spelt | 12-15% | Ancient grain flavor | One Degree Organics |
That said, don't get too hung up on flour selection early on. A decent bread flour from the supermarket — King Arthur is widely available at Ralphs and Vons in San Diego — produces excellent results while you're learning. Save the experimentation with heirloom wheats and stone-ground flours for after you've nailed the basic technique.
What Equipment Do You Actually Need?
The short answer: less than you think. Instagram sourdough culture has created this impression that you need $400 Dutch ovens, proofing baskets lined with linen, and razor-blade lames to produce decent bread. You don't.
The essentials:
- A digital scale — Baking by volume (cups) is imprecise and leads to inconsistent results. Flour compacts. A cup can weigh anywhere from 120 to 150 grams depending on how you scoop. Weigh everything.
- A large mixing bowl — Glass or plastic, at least 4 quarts capacity. Dough doubles, sometimes triples during bulk fermentation.
- A Dutch oven or heavy pot with lid — The Lodge 5-Quart Cast Iron Dutch Oven costs around $50 and works as well as the $400 Le Creuset. The lid traps steam during the first 20 minutes of baking, which keeps the crust soft and allows maximum oven spring.
- A bench scraper — For shaping and cleanup. Metal is better than plastic for cutting dough.
- Parchment paper — Makes transferring dough to a hot pot safe and easy.
Nice to have but optional: a banneton (proofing basket) for the final rise, a lame for scoring, and a baking steel if you want to bake without a Dutch oven eventually. Start with the basics. Master the fundamentals. The fancy tools come later.
What Does the Basic Process Look Like?
A simple sourdough loaf follows a predictable timeline. Here's a standard schedule using 500 grams total flour (a manageable size for home ovens):
Mixing and autolyse (1 hour): Combine 450 grams bread flour, 50 grams whole wheat flour, and 350 grams water. No starter yet — just flour and water. This resting period hydrates the flour and starts gluten development without any effort from you. The dough feels smoother already.
Add starter and salt (5 minutes): Mix in 100 grams active starter and 10 grams salt. The salt goes in after autolyse — adding it earlier tightens the gluten and makes mixing harder.
Bulk fermentation (4-6 hours at room temperature): This is where the magic happens. The dough rises, develops flavor, and builds structure. Every 30 minutes for the first 2 hours, perform stretch-and-folds: wet your hand, grab one side of the dough, stretch it up, fold it over. Rotate the bowl, repeat. Four folds per round. After hour 2, leave it alone. The dough should increase in volume by 50-75% and feel airy, jiggly — alive.
Pre-shape and bench rest (30 minutes): Gently tip the dough onto a lightly floured counter. Shape it into a loose round. Let it rest — this relaxes the gluten so you can shape tighter later.
Final shape and cold proof (12-24 hours): Shape your final loaf, place it in a floured banneton or bowl lined with a floured tea towel, cover, and refrigerate. The cold slows fermentation to a crawl while developing flavor. You can bake after 12 hours or wait up to 48 — flexibility that makes sourdough practical for working schedules.
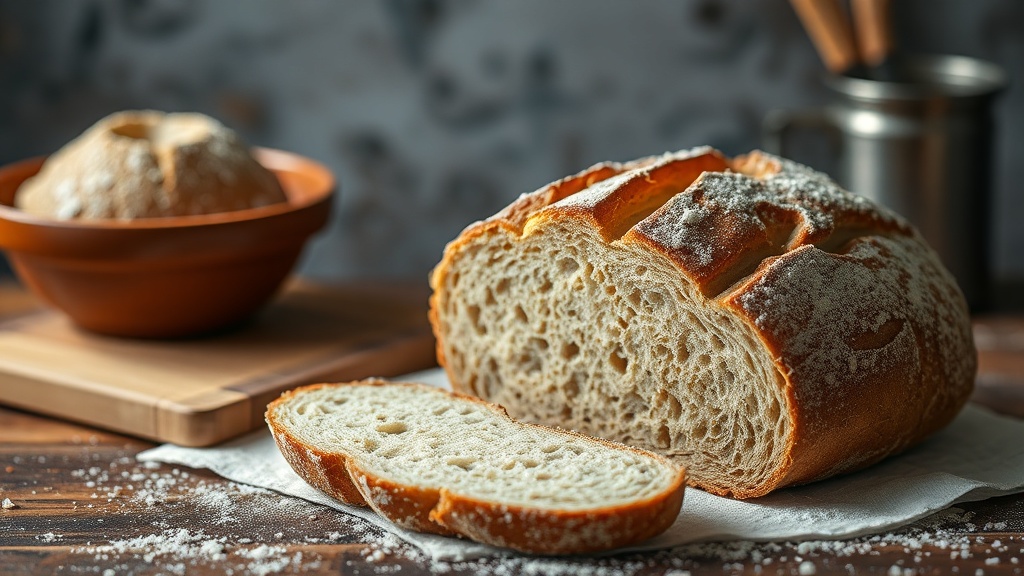
Bake (45 minutes): Preheat your Dutch oven at 450°F for at least 45 minutes. Score the cold dough with a sharp knife or razor — a single deep slash works for beginners. Bake covered for 20 minutes, then uncover for 20-25 minutes until the crust is deep mahogany. Let it cool completely before slicing — at least 2 hours. Cutting hot bread ruins the texture and makes it gummy.
Why Is My Sourdough Dense and Gummy?
Underproofing is the culprit nine times out of ten. The dough hasn't fermented long enough, so the yeast hasn't produced sufficient gas to create an open crumb. The loaf seems heavy, the crumb is tight and wet-looking, and the flavor is bland.
Other common issues:
- Starter not active enough — If your starter isn't doubling predictably within 4-6 hours of feeding, it's not strong enough to leaven bread. Give it more time, warmer temperatures (78-80°F is ideal), or more frequent feedings.
- Too much water — High hydration (80%+) creates those Instagram-worthy open crumbs, but it's harder to handle and shape. Start at 70-75% hydration while learning.
- Slashing too shallow — A shallow cut doesn't allow proper expansion. The loaf bursts in random places instead of opening along your intended score line.
- Cutting too soon — Steam trapped inside needs time to escape. Slicing before the loaf cools releases that moisture into the crumb, creating gumminess.
"Your first ten loaves are for learning. Your next ten are for understanding. After that, you start baking." — Chad Robertson, Tartine Bread
That quote comes from Robertson's Tartine Bread — the book that launched a million sourdough obsessions. It's worth picking up once you've baked a few loaves and want to dive deeper into technique.
How Do You Store and Use Leftover Sourdough?
Store the cut side down on a cutting board — no bag, no container. The crust protects the crumb. A good sourdough loaf stays fresh for 3-4 days this way. Once it starts to stale, that's your signal: time for toast.
Don't throw away stale bread. Cube it for croutons (toss with olive oil, garlic, salt, bake at 375°F until crisp). Pulse it in a food processor for breadcrumbs. Make panzanella — the Italian bread salad that actually requires day-old bread to achieve the right texture. Or follow the King Arthur sourdough discard pancake recipe — fluffy, complex, and a perfect use for the starter you'd otherwise toss during feedings.
Discarded starter — the portion you remove before feeding — has become a subgenre of sourdough baking itself. Crackers, brownies, pizza crust, English muffins. That acidic, fermented batter adds depth that plain flour can't match. Keep a jar of discard in your fridge and experiment. Some bakers (the organized ones) maintain a separate discard container specifically for recipes.
Baking sourdough isn't about perfection. It's about rhythm — feeding the starter, mixing the dough, folding, shaping, baking. The repetition builds intuition. After a few months, you'll feel when dough is ready, not just follow the clock. The thermometer reading matters less than how the dough responds to a poke. That tactile knowledge — the slight resistance of properly developed gluten, the jiggle of well-fermented dough — that's when you know sourdough has become part of your kitchen, not just a recipe you follow.